As the world shifts towards sustainability and eco-conscious living, many individuals are looking for ways to reduce their carbon footprint. One of the most practical and impactful solutions is harnessing solar power. Solar energy is clean, renewable, and available in abundance. In this article, we will guide you through a step-by-step process to create a solar-powered charger from scratch, providing you with the tools and knowledge to tap into renewable energy for your personal devices. Whether you’re an engineering enthusiast or simply curious about solar power, this project will allow you to experience the benefits of solar energy first-hand.
Why Build a Solar-Powered Charger?
A solar-powered charger can be an excellent addition to your home or outdoor activities, providing a green alternative to traditional charging methods. Solar chargers are beneficial because they reduce dependence on the electrical grid and promote energy independence. By building one yourself, you not only get to learn more about renewable energy but also contribute to reducing environmental impact. Plus, a DIY solar-powered charger can be customized to suit your needs and can be used for small devices like phones, tablets, and portable electronics.
Materials You’ll Need for Your Solar-Powered Charger
Before diving into the building process, you’ll need a few essential components. Here’s a list of the basic materials required to create your solar-powered charger:
-
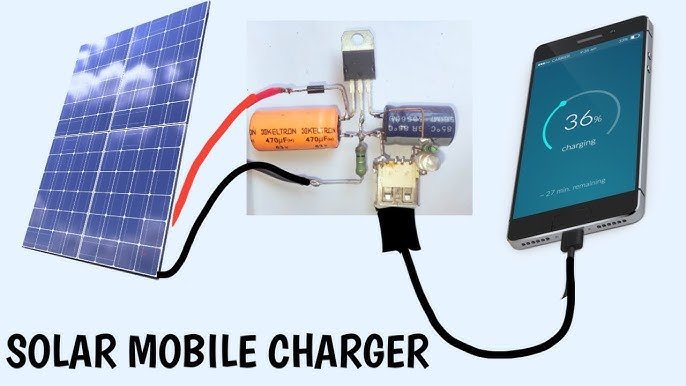
Solar Panel (5V): This is the heart of the system, capturing sunlight and converting it into electrical energy.
-
Charging Controller: This component regulates the voltage coming from the solar panel to ensure it’s safe for your devices.
-
Battery (Lithium-ion or LiFePO4): The battery stores the energy collected by the solar panel to charge your devices later.
-
Diode: Prevents backflow of electricity, protecting your system from damage.
-
USB Charging Port: Allows you to connect your devices and charge them via USB.
-
Wires: To connect all the components.
-
Enclosure (Plastic or Wooden Box): Keeps everything safe and organized.
-
Soldering Iron and Solder: For making secure electrical connections.
Step-by-Step Guide to Building a Solar-Powered Charger
Set Up the Solar Panel
The first step in building your solar-powered charger is to connect the solar panel to the charge controller. The charge controller ensures that the energy from the solar panel is regulated properly before being sent to the battery. This is important because overcharging can damage your battery.
Install the Charge Controller
Next, connect the charge controller to the battery. The charge controller ensures that the energy stored in the battery is properly regulated, preventing overcharging and prolonging the battery’s life.
Add the Diode for Protection
A diode is an essential part of the circuit as it prevents the energy stored in the battery from flowing back into the solar panel when there’s no sunlight.
Connect the USB Charging Port
Once the battery is connected, the next step is to add the USB charging port. This port will allow you to connect your phone, tablet, or other devices for charging. You will wire this port to the battery and charge controller.
Secure Everything in an Enclosure
Once all the wiring and connections are complete, it’s time to house the components in an enclosure to protect the system from the elements. You can use a plastic or wooden box to store the solar panel, charge controller, battery, and USB charging port.
Testing Your Solar-Powered Charger
After the assembly, it’s time to test your solar-powered charger. Place the solar panel under sunlight and connect a device to the USB charging port. The charging light on your device should turn on, indicating that the charger is working correctly.
Solar-Powered Charger Efficiency Comparison Chart
| Component | Energy Conversion Efficiency | Cost | Usage |
|---|---|---|---|
| Solar Panel | 15% – 20% | Medium | Captures sunlight to generate power |
| Battery | 85% | Low to Medium | Stores energy for later use |
| Charge Controller | 90% | Low | Regulates voltage for safe charging |
| USB Port | N/A | Low | Provides output for devices |
Tips for Optimizing Your Solar-Powered Charger
-
Panel Positioning: For optimal performance, position the solar panel where it will receive maximum sunlight exposure. The angle of the panel matters, so adjust it throughout the day if possible.
-
Use a Higher Capacity Battery: If you need to store more energy for extended use, opt for a larger battery.
-
Check the Voltage and Current: Ensure that the output of the charge controller matches the voltage requirements of the devices you want to charge. Most phones require 5V USB charging.
-
Add a Voltage Regulator: If your system outputs higher voltage, you can use a voltage regulator to ensure the proper voltage is being delivered to your devices.
FAQs About Solar-Powered Chargers
Q1: How long does it take to charge a device with a solar-powered charger?
-
The charging time depends on the power of the solar panel, the battery capacity, and the device’s battery size. On average, it may take several hours of sunlight to fully charge a smartphone.
Q2: Can I use this solar-powered charger indoors?
-
Yes, you can use it indoors, but it will only work when there is direct sunlight. You might want to place the panel near a window or use a lamp that mimics sunlight for charging.
Q3: How much does it cost to build a solar-powered charger?
-
The cost of building a solar-powered charger can vary depending on the components you choose, but on average, the project may cost anywhere from $30 to $100.
Q4: Is it possible to charge larger devices like laptops with a solar-powered charger?
-
While the DIY solar-powered charger we discussed is suitable for smaller devices like phones and tablets, it’s possible to create a system capable of charging larger devices like laptops. This would require a more powerful solar panel, a larger battery, and a more robust charge controller.
Q5: How long will the solar panel last?
-
Solar panels are built to last for many years. On average, they have a lifespan of 25 to 30 years, though their efficiency can decrease over time.
Conclusion
Creating a solar-powered charger from scratch is a fulfilling and educational project that allows you to tap into renewable energy while reducing your reliance on traditional power sources. With just a few simple components and some basic engineering skills, you can build a solar-powered charger that is both functional and eco-friendly. Not only will you learn about solar power and energy storage, but you will also have the satisfaction of knowing that you are contributing to a greener planet.
As you continue to explore solar power and renewable energy, consider expanding your knowledge and experimenting with more advanced projects. The future of energy is green, and creating your own solar-powered devices is a step in the right direction.
References:
-
U.S. Department of Energy – Solar Power Systems energy.gov
-
National Renewable Energy Laboratory – Solar Energy nrel.gov