Introduction:
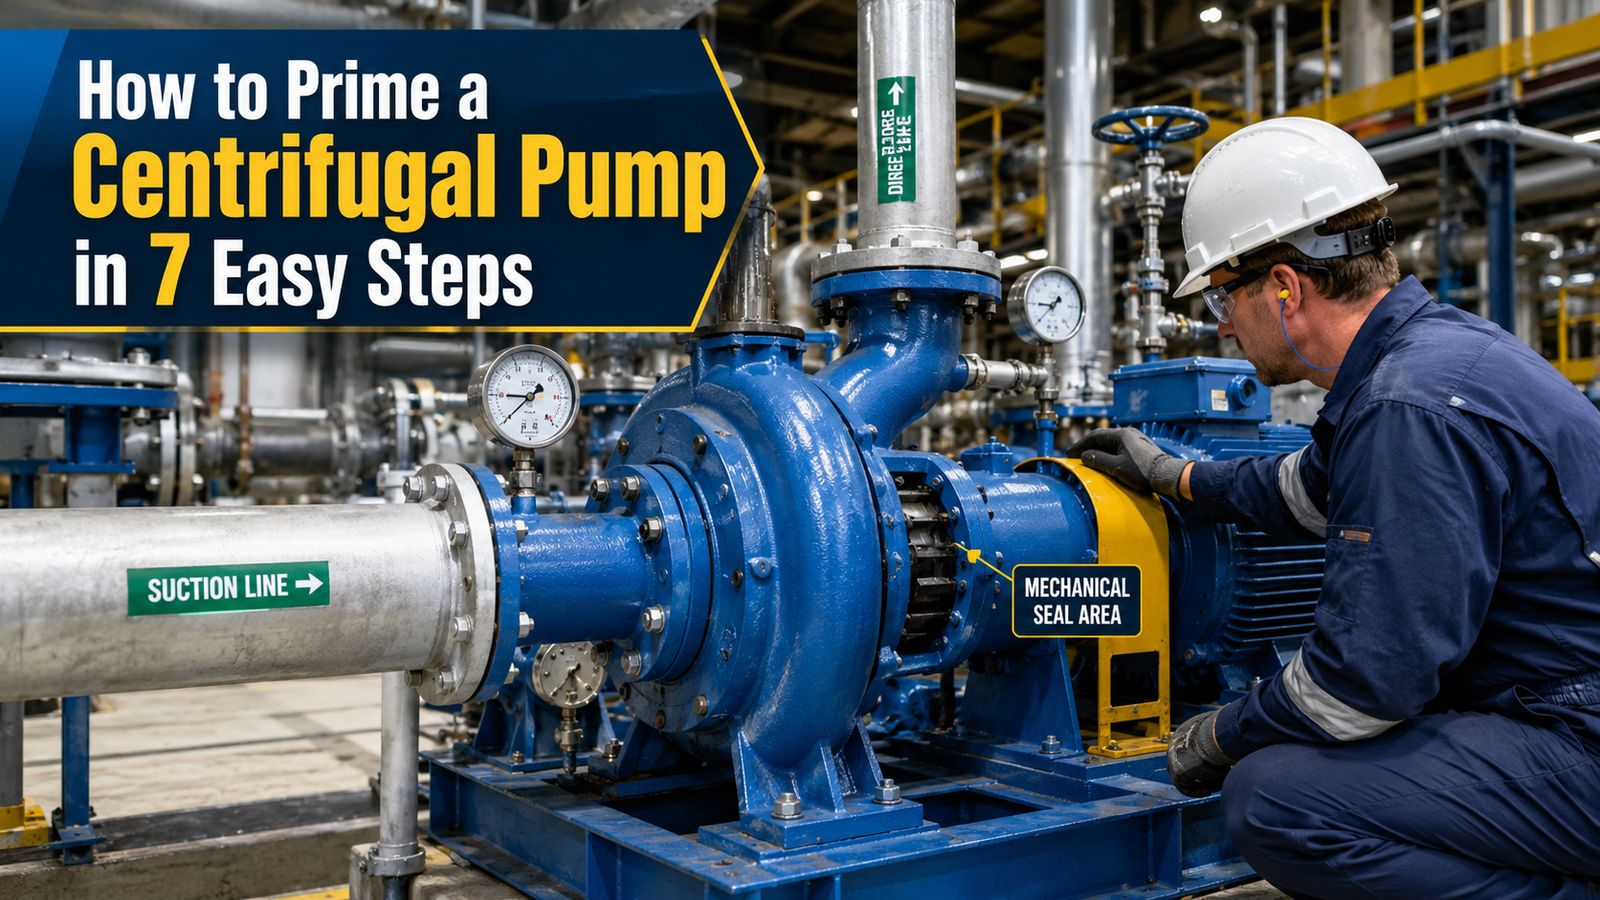
You’re on the floor, a pump startup is due, and someone asks: “Did you prime it?” If you pause for even a second, that’s a problem.
Skipping or rushing the priming process on a centrifugal pump leads to some of the most avoidable equipment failures in any plant. Dry running, cavitation, seal damage — none of these are mysterious. They’re almost always the result of a bad startup procedure.
This guide walks you through exactly how to prime a centrifugal pump, step by step, the way an experienced maintenance technician would actually do it on the floor.
👉 Learn practical maintenance techniques of rotating equipment here: [If you want to deeply understand compressors, pumps, and other rotating equipment with real-world industrial examples, this course is highly recommended.
👉 Learn practical Rotating equipment masterclass here: [trk.udemy.com/enqb2r]
👉 Get full subscription access: https://trk.udemy.com/PzKGrq
What Is Centrifugal Pump Priming?
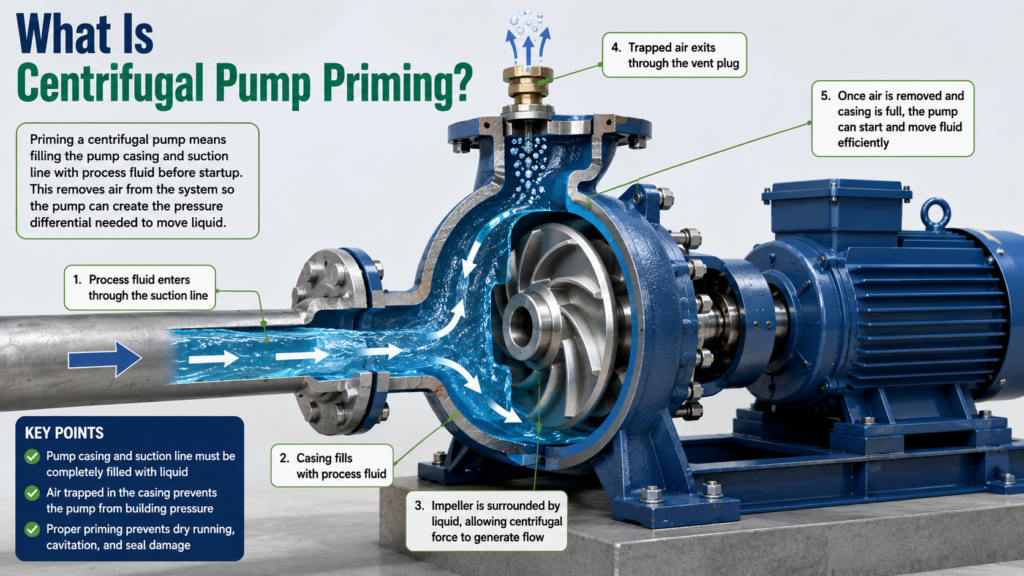
Priming a centrifugal pump means filling the pump casing and suction line with process fluid before startup. The pump needs liquid — not air — surrounding the impeller to generate flow using centrifugal force.
Unlike positive displacement pumps, most centrifugal pumps can’t move air efficiently. If air gets trapped in the casing, the impeller just spins without creating the pressure differential needed to pull liquid through. That’s called an air lock, and it kills flow instantly.
Priming removes that air and replaces it with liquid so the pump can do its job the moment it starts.
Why Proper Pump Priming Matters:
Technicians who’ve seen pump failures firsthand will tell you the same thing: most of them were preventable. Here’s what bad or skipped priming actually causes:
- Dry Running When a centrifugal pump runs without liquid in the casing, the mechanical seal has no fluid film to lubricate and cool it. Seal faces overheat within seconds. In some designs, damage shows up in under a minute. Seal replacement is expensive — priming takes two minutes.
- Cavitation Air pockets or vapor bubbles in the suction line collapse violently against impeller surfaces. That’s cavitation. Over time, it erodes the impeller, damages the pump casing, and creates that distinctive rattling noise operators learn to dread. Proper suction head and a fully primed pump prevent it.
- Seal Damage Many mechanical seals depend on a thin film of process fluid to stay cool and function correctly. Running dry — even briefly — can score the seal faces or cause premature failure.
- Loss of Flow Efficiency An improperly primed pump won’t reach design flow rate. Low flow rate leads to process problems downstream, and operators often don’t connect it back to the startup procedure.
- NPSH (Net Positive Suction Head) is also tied directly to priming. If the suction line isn’t fully filled, available NPSH drops below required NPSH, and the pump will cavitate even at normal operating speeds.
📘 Suggested Course: Centrifugal Pumps – Principles, Operation and Design
👉 If you want to clearly understand pump working principles, hydraulic design, and real-world industrial applications, this course is highly recommended.
👉 Learn pump fundamentals and design concepts here: [https://trk.udemy.com/PzK1XN]
👉 Get full subscription access: https://trk.udemy.com/PzKGrq
How to Prime a Centrifugal Pump in 7 Easy Steps:
Step 1: Inspect the Suction Line:
- Before touching any valves, do a physical walkthrough of the suction line. Look for isolation valves that are partially or fully closed, check for any recent maintenance that may have left the line drained, and confirm the suction source — tank, sump, or header — actually has fluid at the right level.
Field Note: Low suction head is one of the most common causes of priming failure. If your fluid source is borderline, check elevation difference against your pump’s required NPSH before you go further.
Common Mistake: Assuming the suction line is full because it was full last shift. Leaks, maintenance activities, or drain valves left cracked can empty a line faster than you’d think.
Step 2: Open Required Isolation Valves:
- Open the suction isolation valve fully. Leave the discharge valve closed or partially closed for now — you’ll crack it open once the pump is running and primed.
- Verify that all bypass lines, vent connections, and drain valves are in the correct position for startup. A closed suction valve during startup is a textbook pump killer.
Field Note: Some facilities use lockout/tagout procedures on isolation valves. Always verify LOTO status before repositioning any valve.
Common Mistake: Partially opening the suction valve. That restriction reduces flow, drops suction pressure, and can cause cavitation even with a properly primed pump.
📘 Suggested Course: Pump and Motor Basics, Selection and Optimization (HVAC)
👉 If you want to clearly understand pump selection, motor sizing, and HVAC system optimization with practical examples, this course is highly recommended.
👉 Learn step-by-step fundamentals and real-world applications: [https://trk.udemy.com/PzK1LX]
👉 Get full subscription access: https://trk.udemy.com/PzKGrq
Step 3: Fill the Pump Casing:
- Most pump systems have a priming connection or fill port on the pump casing. Open it and fill the casing manually using a priming funnel or gravity fill from the suction source.
- On systems where the suction source is above the pump (flooded suction), simply opening the suction valve may fill the casing on its own. Confirm liquid is present before moving on.
- For systems where the pump is above the fluid source (suction lift), you’ll need to fill manually or use a vacuum priming system to pull liquid up into the casing.
Field Note: Don’t rush this step. Fill slowly to avoid trapping air pockets inside the casing. The casing should be completely full of process fluid before startup.
Common Mistake: Assuming a flooded suction automatically fills the casing. Air can still be trapped if the vent plug hasn’t been opened.
Step 4: Vent Trapped Air:
- This is the step most people skip — and it’s the one that causes the most callbacks.
- Open the vent plug on top of the pump casing while filling. Air needs a way out as liquid fills the casing. If you close the fill port without venting, you’ve trapped an air pocket that will cause an air lock the moment the pump starts.
- On some pump designs, you’ll need to rock the shaft slightly or bump the motor to help dislodge trapped air during filling.
Field Note: Keep venting until you see a steady stream of liquid with no air bubbles. A little liquid coming out of the vent plug is exactly what you want to see.
Common Mistake: Closing the vent too early. Even a small air pocket left in the casing can cause the pump to lose prime immediately after starting.
📘 Suggested Course: Mastering Pump Fundamentals – Design, Selection & Operation
👉 If you want to clearly understand how pumps are designed, selected, and operated in real industrial applications, this course is highly recommended.
👉 Learn practical pump fundamentals here: [https://trk.udemy.com/4aJ6Qr]
👉 Get full subscription access: https://trk.udemy.com/PzKGrq
Step 5: Check Mechanical Seal Area:
- Before starting, visually inspect the mechanical seal area for any signs of weeping, damage, or improper assembly after recent maintenance. If the seal is dry or shows signs of heat damage, don’t proceed — tag it out and investigate.
- On pumps with a seal flush line, confirm flush flow is running and connected properly. The seal flush keeps process fluid circulating across seal faces, especially important when handling hot or hazardous fluids.
Field Note: On newly installed or recently maintained pumps, it’s worth turning the shaft by hand before startup to confirm it rotates freely and the seal isn’t binding.
Common Mistake: Ignoring a minor weep at startup. Seal leaks don’t get better on their own. A small leak at startup often becomes a major leak — or a seal failure — within hours.
Step 6: Verify System Readings:
- Check pressure gauges on the suction and discharge sides. Suction pressure should reflect the static head of fluid in the supply source. If you’re reading zero or negative on suction, something is wrong — go back to Steps 1–4.
- Confirm system pressure on the discharge side is within normal operating range for your process. On a closed discharge valve, you’ll see a static pressure reading. That’s expected before startup.
Field Note: On variable-speed systems, also verify that your VFD or control system is configured for the correct startup ramp rate. Hammering a pump to full speed with a closed discharge valve can cause water hammer and damage.
Common Mistake: Skipping gauge checks because “the pump looked fine.” Instrumentation exists for a reason. A two-second gauge check can catch a problem that would otherwise show up mid-run.
📘 Suggested Course: Pump Sizing & Modeling Piping Systems For Liquids
👉 Proper pump selection and piping design are critical to avoid energy losses, cavitation, and system failures.
👉 Learn how to size pumps and model piping systems effectively: [https://trk.udemy.com/JkJ5E7]
👉 Get full subscription access: https://trk.udemy.com/PzKGrq
Step 7: Start and Monitor the Pump:
- With the casing full, air vented, and valves in the correct position, start the pump. Slowly open the discharge valve as flow and pressure build.
- Listen and feel — a properly primed pump will build pressure quickly and run smoothly. If you hear rattling, grinding, or a hollow high-pitched noise, stop immediately. Those are signs of cavitation or an air lock.
- Monitor suction pressure, discharge pressure, and flow rate for the first few minutes of operation. Confirm readings are within expected range before leaving the equipment.
Field Note: On critical pumps, it’s worth staying close for the first 5–10 minutes after startup to catch any early signs of priming problems, seal weeps, or abnormal vibration.
Common Mistake: Walking away immediately after pressing the start button. The first few minutes of operation are when most startup problems surface.
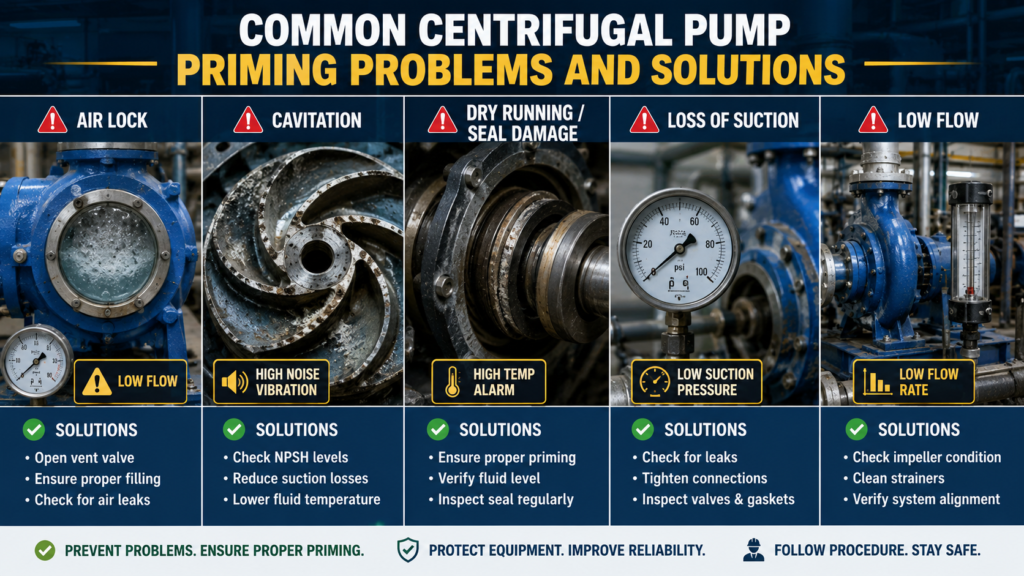
Common Centrifugal Pump Priming Problems and Solutions:
| Problem | Possible Cause | Recommended Action |
| Air Lock | Air trapped in casing or suction line | Stop pump, re-vent the casing, check suction line for air entry points |
| Loss of Suction | Suction valve partially closed, low fluid level, or suction line leak | Check suction isolation valve, verify fluid level, inspect suction line for leaks |
| Cavitation | Insufficient NPSH, high suction lift, or partially blocked suction strainer | Check suction strainer, reduce suction lift if possible, verify NPSH available vs. required |
| Dry Running | Pump started before priming was complete | Stop pump immediately, re-prime fully, inspect mechanical seal before restarting |
| Low Flow Rate | Partially closed discharge valve, air in system, worn impeller | Open discharge valve fully, re-vent system, inspect impeller if problem persists |
📘 Suggested Course: Flow of Fluids Through Piping Systems, Valves and Pumps
👉 Understanding fluid flow, pressure losses, and valve behavior is essential for designing and maintaining efficient piping systems.
👉 Learn practical fluid flow concepts and real-world applications here: [https://trk.udemy.com/vDyeLy]
👉 Get full subscription access: https://trk.udemy.com/PzKGrq
Field Tips From Industrial Maintenance Teams:
- Label vent plugs and priming ports clearly so new operators know exactly where to go during startup.
- On pumps that prime frequently, install a permanent sight glass on the suction line so you can confirm fluid presence without opening anything.
- Always record the first startup after maintenance in a logbook — note priming time, gauge readings, and any abnormalities.
- Keep a dedicated priming funnel near pumps that require manual filling. It sounds minor, but having the right tool at the pump reduces skipped steps.
- If a pump repeatedly loses prime in the same location, trace the suction line carefully. Small check valve failures and leaking flange gaskets are frequent culprits that get overlooked.
- On hot fluid systems, allow the pump casing to warm up slowly by cracking open the suction valve before full flow. Thermal shock on a cold casing can crack mechanical seal faces.
- Train operators to recognize cavitation noise. Early identification saves impellers.
- After any suction line repair, always re-prime from scratch — don’t assume the old prime is still holding.
Frequently Asked Questions:
1). Can a centrifugal pump self-prime?
- Standard centrifugal pumps cannot self-prime. They require liquid in the casing before startup. There are self-priming centrifugal pump designs that use a recirculation chamber to retain liquid and prime on their own, but even those have limits and usually need the suction line to be within a specified lift range.
2). What happens if a pump runs dry?
- The mechanical seal overheats almost immediately without liquid lubrication. Seal faces can score or crack within seconds to minutes depending on the design. Bearings can also suffer damage from vibration when the impeller is spinning in air. Short dry-run periods may not cause visible damage, but repeated dry runs shorten pump life significantly.
3). How long does pump priming take?
- On most industrial centrifugal pumps, manual priming takes two to five minutes when done correctly. Larger pumps with long suction lines may take longer. Self-priming systems can re-establish prime in under a minute on a properly designed installation.
4). Why does a pump lose prime?
- The most common causes are air entering the suction line through a leaking gasket or fitting, a suction valve creeping closed, the fluid level dropping below the suction inlet, or a worn check valve allowing the suction line to drain back. A pump that repeatedly loses prime needs a suction line inspection, not just re-priming.
5). Can cavitation damage a pump?
- Yes — and the damage accumulates over time. Cavitation creates micro-implosions of vapor bubbles against the impeller surface. The result is pitting that looks like small craters on impeller blades. Severe cavitation can erode an impeller to the point of replacement in months. It also puts stress on the mechanical seal and bearings. Address the root cause — usually NPSH margin or suction conditions — rather than just tolerating it.
Conclusion:
Priming a centrifugal pump correctly takes only a few minutes, but skipping steps or rushing through them leads to equipment damage that takes far longer to fix. Following a consistent centrifugal pump startup procedure — from suction line inspection through post-startup monitoring — protects your pump, your mechanical seals, and your process uptime.
Keep the procedure posted near the equipment. Make sure everyone on the team knows it. And the next time someone asks “Did you prime it?” — you’ll have a confident answer.